Badge Making in the School Library
This term we launched our new Create program. Part of our Connect, Coach, Create initiative, Create is all about getting students hands on with their learning and exploring in the school library. Think makerspace, craft, baking, anything that gets students, staff and our school community, well…, creating.
Our first Create event was badge making. I wanted to start with something fairly easy (and not too messy). With our current, temporary space that is fairly limited, I knew the activity also needed to be easy to set-up and pack-up.
![]()
Why badge making?
I’d seen school libraries run badge making in their school libraries. It had been on my “I want to try that” list for a while. I really wanted something that would appeal to a wide range of students, would enable those who are artistic to create their own designs but also allow for someone to use a template. I also really wanted to enable students to express themselves, maybe as a reader or a gamer or an artist. I also wanted students to feel that it is a safe space for them to create things like pronoun badges.
What’s needed to get started
To make badges you need a badge making machine. Last year, our Prep students made little bags with badges with hand-drawn artwork and gave them out to the staff. My little brain got to thinking the school must have a badge making machine. I reached out to the Prep teachers who put me in touch with one of the Junior school admins. With a simple ask I discovered that the school does have a badge maker machine, got someone to teach me how to use it and ordered extra blanks to use in the library. When my Library Captain put up posters around the school I was approached not five minutes later by one of the music team with an offer to borrow their two badge making machines. Suddenly I had access to three machines! Amazing how the school community is such a resourceful place.
![]()
I realise that not all schools already have access to a badge maker machine (or three). While you can find a range of machines online, they range in price and quality.
The machines our school has are the R-type machines purchased through ABC2000.com.au. Starter kits with everything you need start at $320 (that’s Australian dollars), getting more expensive for the larger machines. I can personally say these are really high quality machines and super easy to use. You can also use the same machines to make everything from magnets to key rings.
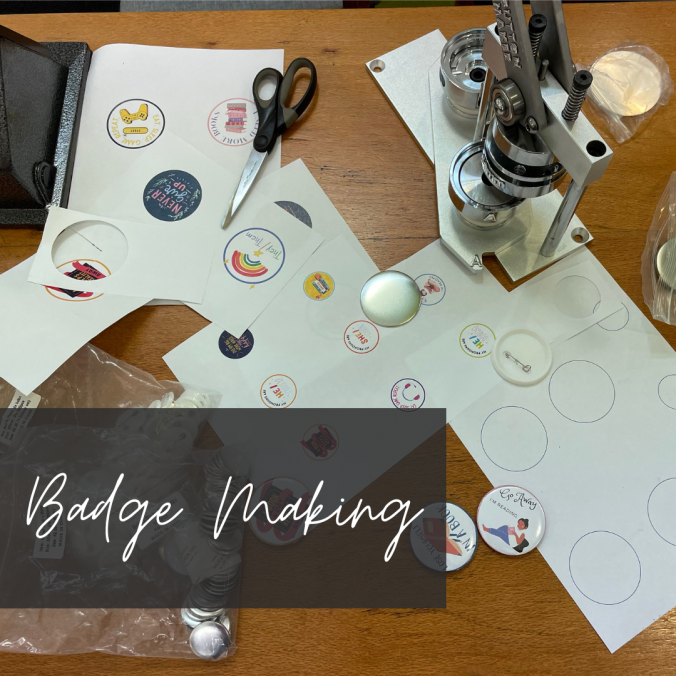
Materials
To run a badge making activity we had
- At least one badge making machine
- Badge blanks, which include a back, metal front and plastic.
- Circle cutter (or you could hand cut these with scissors)
- Templates – designs or blank for students to design on.
- Scissors and pens
Old books or old graphic novels also work really well for making badges.
![]()
Templates
I created a range of designs in Canva to put out with our badge making, so students could select and make. They were really popular, as I think most students just enjoyed the process of making the badges rather than taking the finished product with them. I had a range of artwork, book related slogans and ‘my pronouns are…’ designs. I also created blank circles in the right size for students to create their own designs.
Here’s a PDF with some designs to get you started.
Our badge makers need a fair bit of space around each design for the circle cutter, so that’s why my designs are so spread out on the page.
Promoting
We decided to start with just one badge making session, during a lunchtime. We promoted this to the students via our Instagram page, Library homepage, posters around the school and an announcement in the school assembly. When heavy rain and flooding hit the area and the school was closed, we had to postpone and reschedule. Again we spread the word of the event by updated posters and Instagram posts.
![]() Due to popularity and timing (the reschedule landed us in exam blocks and our seniors requested we run it two weeks so they could attend) we ran badge making over three weeks. As more students saw others making badges more wanted to get involved.
Due to popularity and timing (the reschedule landed us in exam blocks and our seniors requested we run it two weeks so they could attend) we ran badge making over three weeks. As more students saw others making badges more wanted to get involved.
Running the event
I created a little how-to video as an Instagram Reel. On the day, we just spread out the machines and the supplies. I only needed to teach two students how to use the machines and they were happy to take over from there, showing other students how to do it. It really was the perfect activity, with little set up, not a lot of mess to clean up and easy to run while also supervising the other students using the library at lunchtime. It also worked for our limited space.
If the badge maker machines belonged to the library, I definitely would have left them set up in the library for students to use whenever they needed. However, without owning the machines and with the cost of supplies in our limited budget, running just a few sessions at lunchtime worked well.

Leave a Reply